Organically Inspired. . .
Search


Monthly Archives: August 2010
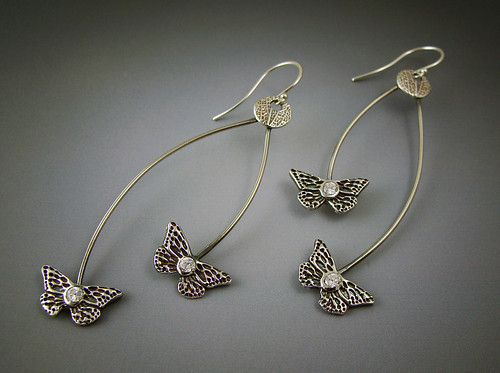
Butterfly Earrings and the Lessons Learned
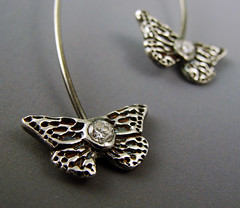 A friend asked me to create a custom pair of earrings for her. She had a pair that she loved, but they were made of cheap materials and were starting to look quite worn, and well, cheap. I didn’t feel comfortable making a direct copy of these earrings, but we talked about how I could interpret the design in fine silver, change things up a bit, and hopefully create a new pair that she would love even more.
This design is WAY outside my comfort zone. Seriously, left to my own creative whims, I would never have created something like this. I like the design, it’s just not my style. The good news is that I had to push myself to figure out creative engineering solutions and develop new skills to complete this project. I have a love/hate relationship with custom orders for exactly this reason. I always learn something new, but custom orders frustrate me more than anything else I create.
I thought it would be useful to me (and hopefully to you) to recount the techniques I attempted, the problems I encountered and the lessons I learned along the way.
- My first attempt was to use 16 ga fine silver wire embedded in a pad of wet clay on the backs of the greenware butterflies. I learned two valuable lessons. First, a long stretch of 16 ga fine silver wire will not work harden to my standards of durability. I considered using a heavier fine silver wire, but the wire was just too bulky for the scale of the other elements. Second, if you hit a CZ with a hammer, it will shatter in place and become an instant cloudy mess. Duh!
- My second attempt was to solder argentium wire to the fired butterflies. Through my research, I learned that you can get argentium paste solder, which is useful for ensuring that the solder is as tarnish resistant as the wire. I don’t have much soldering experience, and I apparently got the piece too hot, which once again cracked the cz. I probably could have made this work with practice, but was unsure how many butterflies I might ruin in the process. But, I now have argentium solder in my toolkit whenever I need it in the future.
- The third attempt was the winner. I used argentium wire and embedded them into pads of wet clay on the backs of the greenware butterflies. I had to reduce the firing temperature to accommodate the argentium, but I think it was a good trade off.
- I also got some practice with creating photopolymer plates. I was taught to first create a transparency, then develop the design in TNF (thermo negative film) and then use the TNF to create the photopolymer plate. I think this process was developed because most transparencies don’t come off the printer with rick, dark blacks. Mine tend to be a bit muddy. The TNF creates a nice, crisp black and clear image with really solid blacks. But, in my opinion, the TNF step is a time-consuming pain in the neck. So, I experimented with my butterfly image to see if I could skip the TNF. I printed 2 of the images at exactly the same size, printed them to transparency, and then stacked them up. I had to fiddle with them to get the transparencies perfectly aligned, and then I taped them together. This created a nice, solid image and it created a perfect photopolymer plate. Admittedly, I’m probably not the first person to figure this out, but it was a real “aha” moment for me!
I really hope my friend likes the earrings. I will be very happy to deliver them and cross this project off my list, and I know it will make me smile every time I see her wearing them.
The Power of an Almost Dry Brush
Sometimes I’m a little slow to catch on. I’ve learned from a bunch of talented teachers. I’ve read dozens of books and hundreds of blog posts about metal clay techniques. I’ve watched demos and online videos. I know I’ve heard this before. So, how did it take over a year for me to really “get”…
New Photo Cube
I love, love, love my new EZ Cube. It’s so sweet, tiny and efficient! I went for the 12″ cube, which allows me to keep it set up in a permanent location. A larger cube wouldn’t fit on this little table, so I would have to break it down after each use. I’m using two…
New Maker’s Mark and Work in Progress
I’m going to order one of those crisp little maker’s mark stamps from Babette Cox, but I wanted to do a bit of testing first to be sure I do it right. For example, do I want my mark to be embossed or debossed, or in simpler terms, will the letters be “inny” or “outty”? …
PMC Conference Wrap-Up
I recently attended the PMC Conference at Purdue University in Lafayette, Indiana. This was my first conference as I started working with the material just over a year ago. I’ve attended classes and workshops, but the conference experience was quite different. For example, the conference features presentations and demonstrations, unlike a hands-on workshop. The schedule…