Organically Inspired. . .
Search


Monthly Archives: February 2011
Enameling Demystified
 There’s just no substitute for a good teacher and a hands-on learning opportunity. This was true when I took my introductory week-long metal clay class from Pam East in 2009, and it was certainly true of this weekend’s enameling workshop. I’ve read enameling books cover to cover, but I just haven’t had the confidence to try it by myself. After this workshop, I fear I may have sparked another addiction. Hold me back before I shop again!
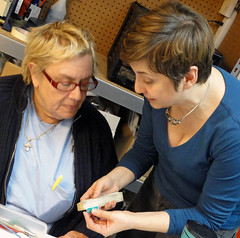
 Five of us gathered in Pam’s well-equipped home teaching studio for two days of metal clay and enamel immersion. There should have been six in the class, but poor Julie came down with the creeping crud and was kind enough not to share it with us. Mimi, Sue, Karen, Linda and I had a fine time cheering each other on, and Pam was in excellent form.
During day one we focused on creating our metal clay pieces. While much of the material was a review for me, I picked up some great tips and learned how some of my well-worn techniques can be optimized for enamel application. My main take-away from day one is that the enamel should not be an add-on. I need to design with the enamel process in mind to ensure my piece is well-suited to the enamel and that the design elements are fully integrated.

Day two was all about enameling. Pam has a wonderful way of explaining “why” not just “what” to do, so I felt that I really understood the process at each step of the way. We had created 3 metal clay pieces on Saturday, and Pam let us know we would probably only have time to enamel 2 of them. I chose to focus my time and energy on my biggest, most complex piece. It involved wet-packing enamels in three recessed cells on a domed piece. We learned how to create gradations of color by building up thin layers of transparent enamels and blending where the colors meet. Pam’s demo piece involved blending 3 colors. I, of course, had to complicate things by choosing four colors and making two additional custom blended colors to smooth out the gradation.
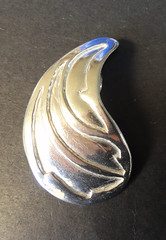
My goal was a full champleve finish, meaning the cells would be slightly over-filled and then sanded back to make a completely level surface between the enamel and the metal borders. I carefully placed the enamel bit by bit, using a tiny paintbrush and a scribe. Five layers were required to slightly over-fill the cells.
Each layer of enamel was fused for two minutes in a HOT kiln and cooled before moving on to the next layer.
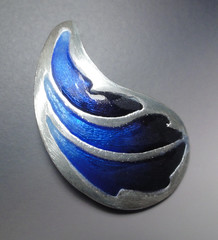 At the end of the day, I was furiously sanding my piece with a diamond-grit sanding pad, but the clock was not my friend. I left Pam’s neighborhood at 6:30 to catch my 9 p.m. flight back to Orlando. Let me just say, it was close! So, my piece is not quite finished, and you can see the dull finish in the photo. Once I grind down the enamel and work through about 10 grits of sanding materials, I will be ready to do the final cleaning and flash-fire the piece to bring it to its final, glossy brilliance.
I’ve got ideas of how to incorporate enamels into my work already bouncing around in my head. Now, if you’ll excuse me, I need to go order more supplies!